DIY Doorbell Quick Demo Circuit Diagram Circuit Diagram. Circuit diagram for this Smart Wi-Fi Doorbell is very simple, just connect two LEDs, a push button and a buzzer to ESP32 GPIO pins. A buzzer is used to make a sound whenever the button is pressed. One LED is used to indicate the power status, and the other LED is used to indicate the network status. JLCPCB Prototype for $2(Any Color): https://jlcpcb.comHello everyone,In this video I will show you how you can make a simple wireless doorbell/calling-bell a

Smart doorbells are an amazing tool but still an expensive one (~$200)! Today in this Instructables, we propose to help you build your own smart home doorbell for less than $40. We will guide you through the basic core steps to build the doorbell with simple components and no need for coding or manual skills. Low Cost Arduino Smart Doorbell: In this Instructables, I will show you how to create a low-cost smart doorbell for around $30 range. In this design, I use an Arduino Wemos with a built Wifi chip to so that the doorbell can communicate wirelessly with your smartphone. Wireless Control; In the future, I hope to incorporate 10s video feature
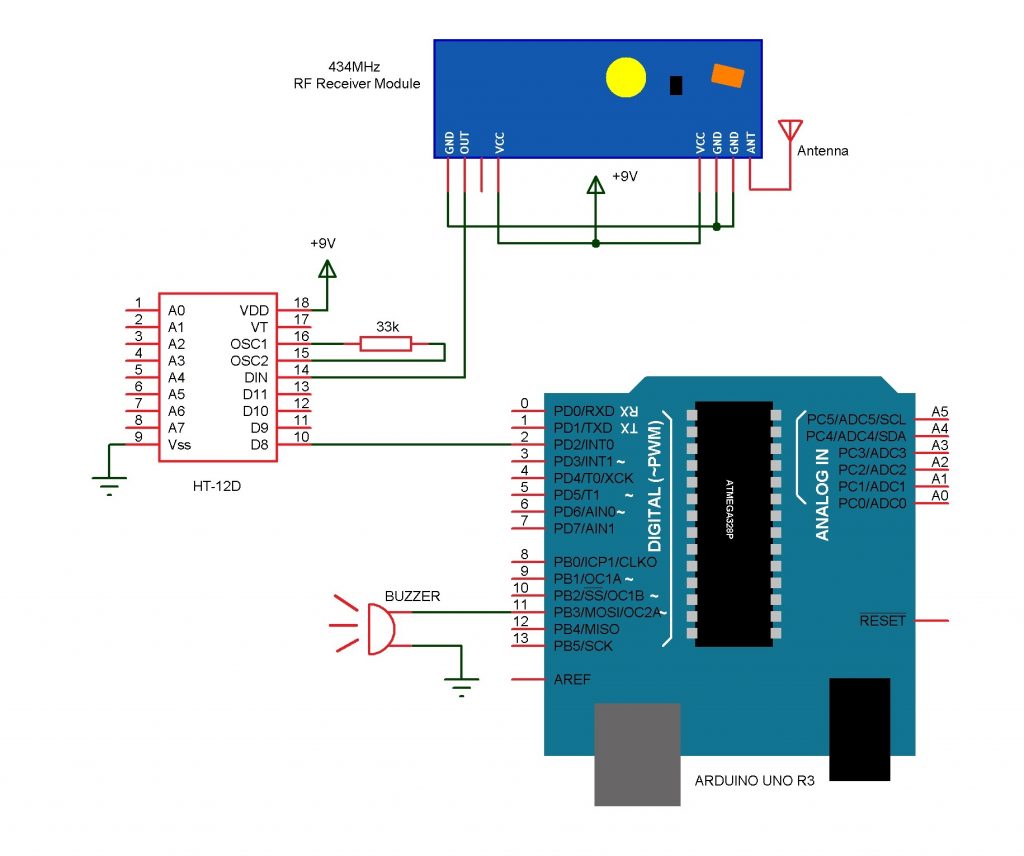
DIY Smart Home Doorbell for Less Than $40! Circuit Diagram
Wireless doorbell systems have become increasingly popular due to their convenience and ease of installation. By eliminating the need for complex wiring, these systems offer a simple and efficient solution for homes and offices. In this article, we will provide a detailed circuit diagram for building a wireless doorbell system, allowing you to If you want to build a simple wired Doorbell you can check this Doorbell using 555 IC tutorials to build one. Hardware Required: RF module; Arduino; Buzzer; Push-button; Breadboard; Connecting wires . 433 MHz RF Module: For our Arduino based Wireless Doorbell, we will be using the 433 MHz Wireless RF modules. An RF module, which is a Radio

Noticing your phone ringing, but you're on the other side of the house? Why not make your own wireless doorbell for your home? You can make it in just a few Make sure you download and install the Blynk app from Playstore/Appstore. First of all, open the blynk application. Click on the create a new project and enter the project name as " IoT Doorbell ". Instead, you can type any name. You can change the name later. Click on Choice Tools and select NodeMCU ESP8266. Make sure the connection type